The life of a designer can be best described as fast-paced, always improving, researching and learning new processes daily, staying on top of trends each week, and never boring. With this fulfilling life comes the need to find ways to complete tasks easier and faster in order to keep up with workloads. In this article, I’ll be sharing 5 of my favorite design tricks to make life easier. Take a few minutes to learn all of these life-changing tricks, below!
Design Secret #1: Using Sublime Text to Save a Company’s “W3” SVG Logo
Let me tell you, this is my favorite design trick and has saved me a lot of time. Whether you need to pull your client’s logo, your client’s client logo, etc. – it can sometimes get complicated. We all know that using the vector/SVG logo is the best way to go, so let me show you how to save a company’s SVG logo from their website.
If you’re a #designer, you know there’s always a better and faster way to do something. In the latest #designarticle from @KyleJCDesign of @RedBranch, you’ll learn 5 of his secrets to making #graphicdesign life easier! Click To TweetKeep in mind not all companies use vector/SVG logos on their website. In fact, some of them use images, in which case you might need to reach out directly or just use the image file.
First, let’s get familiar with Sublime Text. Sublime Text is a Mac-only coding/markup text editor that our dev team uses. As a designer, you don’t need to know how to use it, but you’ll need it to get an SVG from a website. Go ahead and download Sublime Text here. Once downloaded, follow the steps below.
Here’s How to Use Sublime Text to Pull a “W3” SVG Logo:
- First, navigate to the company’s website you’d like to pull the SVG from
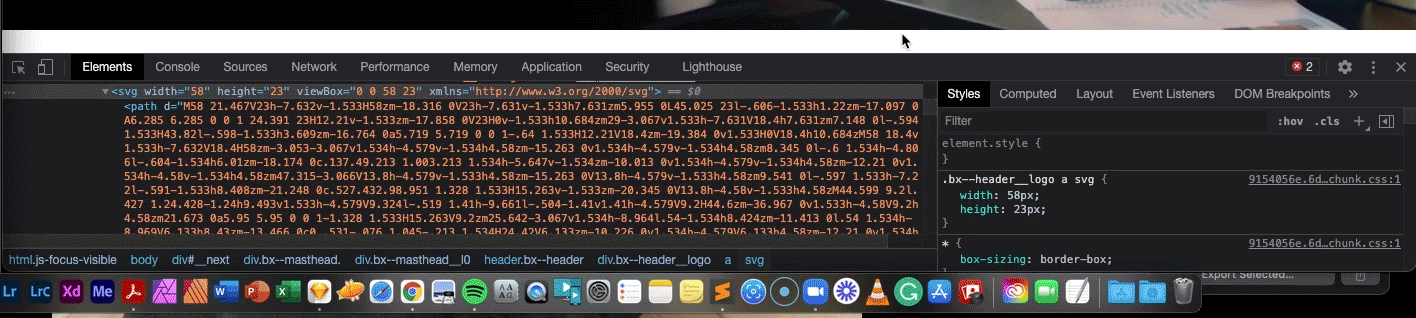
- Right-click on the logo, and select Inspect
- From here, you’ll notice a coding prompt pops up. In the coding prompt, take a look at the highlighted portion. This is showing you, in the code when you clicked on the logo, where it is located in the code of the page.
- If you see .svg highlighted in the code, right-click it and select Open in New Tab. You can now right-click the logo, and select Save As to save the logo as an SVG
- If you see “http://www.w3.org/” highlighted in the code, then you’ll need to use Sublime Text to save the SVG
- Now that you see the “W3” portion of code, right-click the w3 link and navigate to Copy Copy outerHTML. This will copy the embedded SVG code that you’ll paste into Sublime Text.
- Open Sublime Text. In the text prompt, right-click and select Paste. Don’t type anything, and from here, go to File Save As.
- Select a place to save your SVG, and before you hit save, make sure to title the logo with .svg at the end. For example, you can save your logo as “logo.svg” to ensure it saves properly.
- You should now have an SVG logo!
Design Secret #2: Using Auto Spell Check in Design Programs
This is another great secret I’ve stumbled upon over the years of being a graphic designer. Did you know that almost every design program now has a spell check feature? For the Adobe Suite, you can easily check the spelling in your programs. Specifically, did you know that Illustrator and InDesign each have a special Auto Spell Check feature? Follow the instructions below to enable it.
Note: In addition to spell check, it’s good to ensure your grammar is also in check. At RBM, we use Grammarly. As a designer, I recommend downloading & even paying for the ‘pro’ version of this tool to ensure your work is professional. Download it here.
Here’s How to Enable Auto-Spell Check in Illustrator:
- Open your design in Illustrator.
- In the top menu, click Edit Spelling Auto Spell Check
- Right-click any words that have a red jagged line underneath them to see edited suggestions from Adobe
- It’s also a good idea to run a complete spell check once you’re done with your design. To do so, click Edit Spelling Check Spelling. In the pop-up window, click Start to run spell check, then hit Done when you’ve completed spell check.
Here’s How to Enable Auto-Spell Check in InDesign:
- Open your design in InDesign.
- In the top menu, click Edit Spelling Autocorrect
- Right-click any words that have a red jagged line underneath them to see edited suggestions from Adobe
- It’s also a good idea to run a complete spell check once you’re done with your design. To do so, click Edit Spelling Check Spelling. In the pop-up window, go through your document with this tool, then hit Done when you’ve completed spell check.
Design Secret #3: Aligning/Distributing Artboards in Design Programs
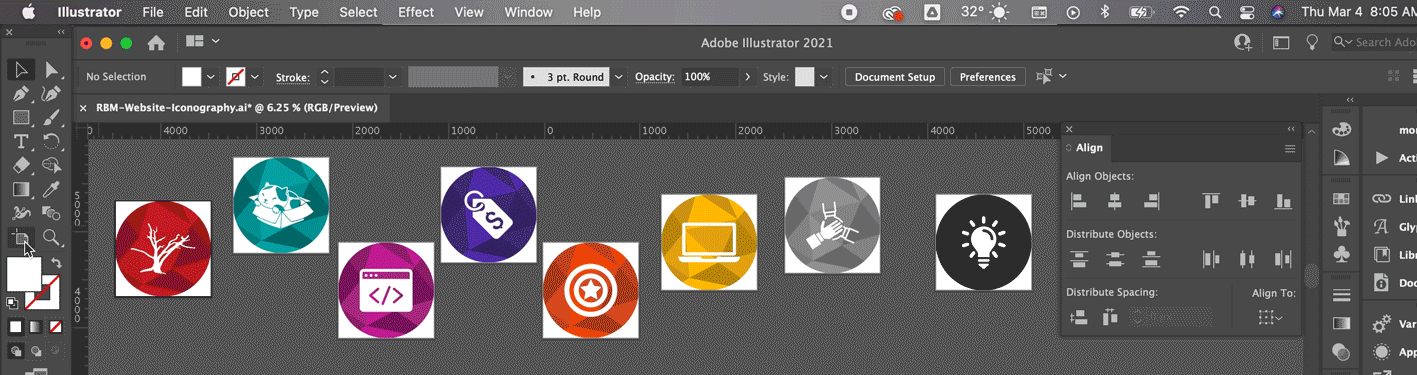
The third secret I’m sharing with you is how to keep your artboards organized. If your work started to get cluttered or scattered, you don’t have to manually move your artboards to get them aligned and organized. Did you know just about every design program that uses artboards has the ability to align and organize them? Follow these quick steps to organize your work.
How to Align Artboards in Your Design Program:
- Open your design in your design program that uses artboards
- Using the Artboard Selector Tool, select all of your artboards, clicking each one while holding the Shift or Command key in order to select them all
- Now that all artboards are selected, use your alignment panel and click on the horizontal and vertical distribution icons to get your artboards spaced out evenly.
- Next, click the horizontal center icon to get all of your artboards centered!
Design Secret #4: Using Vimeo’s Built-In GIF Maker Tool

Did you just make a cool video? Did you know you don’t have to use After Effects or Photoshop to create a GIF out of your video? If you’re a Vimeo user, they have a GIF creation tool built into the video settings of your uploaded video. Not a Vimeo user? Create your own free account here so you can follow the steps below to making fast GIFs from your videos!
Note: Using this tool will save you a lot of time, and the quality of the GIFs is great. You can select any portion of your video to create your GIF to use in your marketing, social media posts, email, etc.
Calling all #graphicdesigners! @RedBranch shares 5 graphic #designsecrets from their bag of tricks that are sure to make your life easier. Click To TweetHow to Use Vimeo’s Built-In GIF Maker Tool:
- Create your account or log in to Vimeo
- Upload your video to your account
- After it’s uploaded, go to your video’s settings
- Once you’re on the video settings page, click the General link on the left sidebar navigation
- On this page, scroll down to find the GIF tool, which is in a box under the Thumbnail editor.
- Click on the blue Create a GIF button to open up the GIF maker tool
- Once this window is open, you can use the blue slider box under the animated video that’s playing. This slider will allow you to select the exact frames you want your GIF to display. For a more accurate selection of frames you want displayed, use the Start and End boxes under the blue slider to type in the exact minute and second you want your GIF to start and end. Keep in mind that GIFs have a max timeframe they can animate, so if you’re seeing Vimeo’s GIF Maker Tool not allow you to make a long GIF, it’s because they have the GIF length restrictions built into the tool. Use the blue slider to see how long and how short you can make your GIF.
- Once you have the frames selected for your GIF animation, click the Create GIF button (this may take a few moments for Vimeo to create this).
- Once the GIF is ready, Vimeo will display an animated thumbnail under the GIF section of the General page of the left sidebar. Click on this animated thumbnail to view your GIF. From here, you can embed it in an email, link it, delete the GIF, and download the GIF.
- Download your GIF and post it!
Design Secret #5: Using Chrome Tabs for Organization
The last secret I have to share is using Google Chrome’s tab organization feature. If you’re a person who likes using a lot of tabs, then this will be a lifesaver for you. If you use a few tabs, then this will help you easily identify where your pages are in your browser window. With this feature, you’re able to have Tabs up top that will color coat your browser tabs with a label (just like a file folder and tabs). You’ll have the ability to hide and reopen the colored tabs with a click to view only certain tab groups as well. Follow these steps to get your tabs set up.
How to Use Chrome Tabs for Organization:
- Open a Chrome window
- Next, open up all your tabs you’d like to organize
- Right-click on one of the tabs, and select Add Tab to New Group
- Here, you’ll label your first tab and select a color for it
- To put tabs in this group, right-click its tab, hover over Add Tab to Group, then click the name of your tab group. To remove a tab from a group, right-click it and select Remove from Group.
- To start a new tab group, follow steps 3-5
- Once you have all your tab groups set, you’re good to go. To collapse a tab group, click on the colored tab and they will temporarily disappear until you click on the tab again.
These secrets should help speed up your graphic design processes and workflows. Whether you need to download an SVG logo, align your artboards, have your designs spell-checked, create custom video GIFs, or organizing your browser tabs, I’m sure these secret tricks will make your workload easier. Try them out today and see if they work for you! Want to see more design tips? Check out our full list of design 101 articles, here!

Related Posts
 6 Minute Read
Awesome Illustrator Tools to Use in 2023
10 Minute ReadHow to Make the Best InDesign eBook Template for Your Company
 8 Minute Read